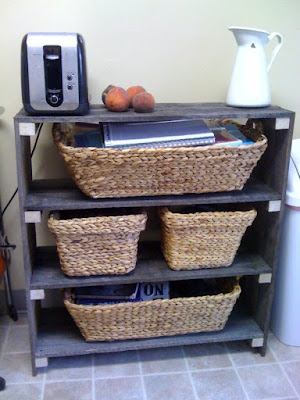
After we finished making our pallet wood mirror, we were sort of on a kick. Since the pallet wood is free {and i like the weathered look of it} we gave some thought to what else we could do with it. Two of the things we still had in our house that were a huge "no-no" were my three drawer {plastic, wal mart, very college dorm} storage containers. I hated the look of them {not so much when no one ever saw them in my dorm room, but they just didn't belong in a house} and was looking for a change.
Furniture is so stinking expensive. One of my favorite stores to home decor shop in is Homegoods {which they don't have in Hampton Roads. Boo-hoo}. They're basically the TJ Maxx or Marshalls of home decor. It's like stuff that bigger stores didn't sell all of, and everything is like 70% off retail price. When we decided to get rid of my two plastic monsters we started looking for something with drawers that would fit that space. Honestly, I think we only found the right piece one time, but said piece of furniture was a tad pricey.
It didn't take long to decide we were going to make something on our own. It took us a little longer to get around to it. One weekend we decided to start. We went for a drive down the nearest "major" road. Behind a store that has batteries for everything, we found stacks of pallets. Matt ran inside, and after getting the o.k., we grabbed three of the pallets and headed to Wal Mart. After way too much deliberation {and rearranging every basket in the basket section to figure out what color, texture, and size we wanted} we left with four baskets. They were almost $50 total, but that's the entire cost of the project, and those baskets will stay with us as long for as long as they'll last. :)
Next, we had to decide what style the book shelf would be. I knew I wanted it to have little feet, and I knew the dimensions I wanted, but we still had to decide whether to make it box/crate like, or a little nicer. Basically, did we want to angle the top boards to make a more appealing bookshelf, or leave everything flat, basically making a crate? We decided to go all posh, and angle the boards. I helped, but Matt did most of the cutting. I marked measurements, and then when we had it all, we glued each side {out of two boards and then four cross beams to hold the boards together and hold the shelves up}. It had to dry over night so we set heavy things on top of it and left it {taking up too much floor space in our Living Room}.
The next day we finished assembling it. Attaching both sides to the top, and adding in the shelves. It's sitting pretty in our Kitchen, helping us keep things organized.


This is awesome, I really like it. We are trying to figure out how to make a TV cabinet out of old wine boxes. This has given me the inspiration I need to get started again. xox
ReplyDeleteAw, thanks! :) I'm glad to be an inspiration!
Delete